Total Pageviews

Wednesday, July 24, 2013

Spicy Chipotle Veggie Patties!

I am not a Vegetarian... but I am a veggie lover! So, I often find myself cooking more meals sans meat, and incorporating veggies into things like meatloaf, pasta dishes, and Mexican cuisine.

I don't know about you, but just the idea of a veggie burger used to frighten me!  I never understood the appeal.  I agree that the frozen beef variety isn't any better [they are very similar to hockey pucks, in my opinion] and if I had my choice at a barbecue, I'd probably decline both of them and make due with the sides!

This recipe born out of an experiment in the kitchen with a few odds and ends I found in my pantry and refrigerator.  My husband and I had been consuming quite a bit of meat, so we both felt it was time for something different. Not all of my experiments go according to plan, but once in a while, I am able to create something amazing and worthy of a permanent spot in my recipe binder.  My husband is the ultimate judge of my food, and he loved this creation!


Spicy Chipotle Veggie Patties
Serves 4

Ingredients:
1 - 15oz can black beans, rinsed and drained
1/2 large onion
3 cloves garlic
1 cup fresh parsley
2 chipotle peppers in adobo sauce
1 tsp ground cumin
1 tsp chili powder
1 egg

3/4 cup garlic flavored bread crumbs
1 tsp lime zest
1/2 cup cooked brown rice
1 cup chopped fresh mushrooms (any variety)

1 tomato, seeded and diced (for topping)

For Chipotle Mayo:
Combine:
1/2 cup light mayo
1-2 Tablespoons chipotle in adobo sauce
Lime zest

Directions:
Preheat the oven to 400 degrees F.  Line a pan with parchment paper and spray the parchment with non-stick spray. Set aside.

Combine the first 8 ingredients in a food processor and blend until well minced and incorporated.

Transfer the contents of the food processor into a medium size bowl.  Add the remaining 4 ingredients to the bowl and mix well with your hands.  If the mixture feels firm enough to form into patties, you are done.  If it is too wet, add more bread crumbs.  If it's too tight, add in one egg white to bind and moisten the mixture.

Chill the veggie mixture in the refrigerator for at least 1 hour prior to cooking.

When ready to cook, divide the mix into 4 equal parts and form into 1 inch thick patties.

Arrange the patties on the parchment lined baking sheet and bake in the oven for 20 minutes, or until the patties are slightly crispy on the outside.  FYI: You do not need to flip the patties.

Transfer cooked patties to plates and top with 2 tablespoons of chopped tomato and about 1 tablespoon of the Chipotle Mayo.

Enjoy!


These veggie patties were so moist and full of flavor, and the chipotles in adobo really added the perfect amount of kick!  The rice and mushrooms lent a nice texture and meatiness to the patties, while the tomato added a nice freshness to every bite!  The creaminess of the chipotle mayo reinforced the flavors in the veggie patties, and the addition of the lime zest in the mayo cut through the richness of the dish.  I know "rich" isn't the first word to come to mind when describing a pure vegetable creation, but believe me, this "burger" is super satisfying with the fiber of the black beans and brown rice to fill you up.  

If I could find a way to market these to a place like Trader Joe's or Whole Foods, I totally would!  I'm not sure how they would hold up to freezing, but next time, I will give it a try!

Librarian turned Foodie 


Thursday, July 18, 2013

Bacon Mac and Cheese

Need I say more?! Did I have you at the mere mention of bacon???

This recipe developed in my mind while I was gazing into my meat/cheese drawer and I realized that I not only had several packages of gourmet cheddar in there, but also a half a package of bacon!  Put the two together, add a bechamel sauce and some pasta, and you have a sinfully delicious side or main dish, depending on how very sinful you wish to be ;-)

But wait, there's more...

Not only did I use whole wheat pasta in this recipe (yay fiber!), but the bacon I used is low-sodium, I used 1% milk instead of whole milk, and there is no butter to be found in here either!  However, I must admit that in place of the melted butter in the bechamel, I used the leftover bacon fat... sue me if you must.  The flavor it lends to food is quite fantastic, so I simply had to do it!

I guarantee this mac and cheese will be the most delicious comfort food creation I have shared with you to date.  So put aside that diet for a day and indulge in some cheesy, bacony goodness :-)

Sinful Bacon Mac and Cheese
Serves 6

Ingredients:
1/2 package of lower sodium bacon, cut into 1 inch pieces
1 box of whole wheat elbow macaroni
2 cups 1% milk, warmed on low power in a microwave oven, or on the stovetop
3 tablespoons all-purpose flour
1/8 teaspoon freshly ground nutmeg
1/4 teaspoon freshly ground black pepper
1/2 cup chopped fresh parsley
2 cups gourmet shredded cheddar cheese blend
1 cup shredded extra sharp Wisconsin cheddar cheese

Directions:
Preheat the oven to 375° F.

Coat the inside of a deep covered baking dish with non-stick cooking spray and set aside.

Bring a large pot of salted water to a boil and cook the pasta for half the suggested cooking time.  Drain pasta and set aside.

In a medium size saucepan, saute the bacon over medium-high heat until crispy.  Remove bacon to a paper towel with a slotted spoon.  Heat the remaining bacon fat over medium heat and stir in the flour, cooking it for about 1 minute.  Pour in the milk and stir until the mixture has thickened to coat the back of a wooden spoon - this is your bechamel.  Stir in the nutmeg, pepper and two-thirds of the parsley.

Pour the reserved pasta into the pan with the bechamel and stir to combine.

Place a third of the pasta mixture in a single layer in the bottom of the baking dish. Top with half of the gourmet cheddar.  Top the cheese with another third of the pasta.  Sprinkle all of the sharp cheddar on top of this layer of pasta.  Use the rest of the pasta to cover the second layer of cheese and top it with the remaining gourmet cheddar cheese.

Sprinkle the cooked bacon pieces and the remaining parsley evenly over the top of the casserole.

Cover it with a lid or tin foil and bake for 40 minutes.  Then uncover and bake for an additional 5 minutes, or until the bacon is crispy.

Let rest for 10 minutes before serving.


This  made for an incredibly flavorful side dish!  It would be a definite crowd-pleaser at any gathering!  Since the mac and cheese is quite rich by itself in all its bacony glory, I decided I would serve it alongside oven-fried buttermilk chicken strips and green beans, which were nice and light, yet still flavorful.  As you can see, my husband and I made a good dent in this... it was soooo good :-)  The crispy bacon on top really made this dish amazing, as it provided a nice crunch to balance out the creaminess of the pasta.  I'd rather have a small portion of this bacon mac and cheese rather than a larger portion of the typical mac and cheese any day!  

I hope you give my recipe a try.  It is a winner!

Librarian turned Foodie

Monday, July 15, 2013

Easy Blueberry Tarts!

Dessert is not something I tackle often, especially when it involves a lot of prep time. My kitchen is tiny and lacking in sufficient counter space, so the process of rolling out dough, sifting, measuring, etc. can become slightly very messy!  So, when I heard about making a dessert crust using pre-packaged almond paste, I was thrilled, and simply had to try it myself!
[Original recipe can be found here: http://beta.abc.go.com/shows/the-chew/recipes/Pear-Almond-Crostata-Brian-Boitano]

This dessert took about 40 minutes to make from start to finish; 20 minutes of prep, and 20 minutes of bake time, thanks to the almond paste crust.  I used blueberries for my tarts, but you could top these beauties with just about any fresh fruit you have on hand.  The original recipe calls for sliced pears, but for Summer, I prefer berries!

Easy Blueberry Tarts 
Serves 3

Ingredients:
4 oz. cream cheese, at room temperature
1 tablespoon sugar
1/2 tablespoon flour
1 egg, beaten
1/2 teaspoon vanilla
One 6-7 oz. package of almond paste
1 pint fresh blueberries
Cinnamon for sprinkling

Directions:
Preheat the oven to 375° F.

In a small bowl, beat together the cream cheese, sugar, flour, 1/2 of the beaten egg, and the vanilla with an electric mixer until fluffy.  Cover and chill for 15 minutes.


Form the almond paste into a log and divide it into 3 even portions (divide into 4 for slightly smaller dessert portions).  Roll out each piece of almond paste on a lightly floured surface until they are about 1/8 inch thick.


Spread about 2 tablespoons of the cream cheese mixture evenly in the middle of each tart shell, leaving a 1 inch boarder around the edge. 


Top the cream cheese mixture with blueberries -- about 1/4 cup per tart.


Fold the outer inch of tart shell into the center and pinch down to form an outer crust on each tart.  Brush the exposed edges of crust with the remaining 1/2 egg and sprinkle the tops of the tarts with cinnamon.


Bake for 20 minutes, or until the tart crust is golden brown. 


Serve the tarts warm from the oven or at room temperature.  Top with vanilla ice cream if desired.

_____________________________

The next time you have unexpected house guests, make this quick and easy recipe and you'll be sure to impress them with your culinary skills :-)

Librarian turned Foodie


Friday, July 12, 2013

Best Dry Rub Around!

'Tis the season for grilling meat, especially a great steak!  While I like red meat, I prefer it to be jazzed up with some great seasonings before it makes its way to my plate.  Thankfully, I hunted down a fabulous, if not the BEST recipe for a dry rub that can be used on just about any piece of meat... I've used it on chicken, flank steaks, roasts, etc. When you are in the mood for a delicious, mouthwatering steak unlike any other, this is the perfect recipe for you!

Delicious Dry Rub Recipe
Yields enough rub for 4 steaks.

Ingredients:
3 tsp. Chili Powder
2 tsp. Paprika
1 tsp. Cumin
1 tsp. Oregano
1 tsp. Coriander
1 tsp. Salt
1 tsp. Pepper
1 tsp. Garlic powder
1 tsp. Onion powder
Pinch of cayenne pepper

Directions:
Place all the spices in a small bowl and grind together. Spread evenly on both sides of the steaks.


Wrap the steaks tightly in plastic wrap and place in the refrigerator for a few hours, or until ready to grill.  The longer this mixture sits on your meat, the better it will taste!  Make sure you let the steaks come to room temperature prior to grilling, searing, etc.


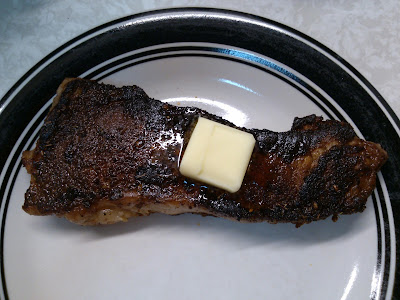
I seared these babies in a skillet over medium-high heat in grapeseed oil for about 3 minutes on each side. The trick to a great steak is to NEVER OVERCOOK IT!  I prefer my steaks medium-rare, with a lovely crust on the outside and a juicy tenderness on the inside.  


Remember to let the meat rest for about 5 minutes off the heat after it is finished cooking to let the juices redistribute.  The addition of a pat of butter melted over the top of the steaks is simply divine... I highly recommend trying this indulgent, finishing touch!


Beef... it was for dinner, and it was ohhhh so delicious :-)

Happy Friday!

Librarian turned Foodie
Thursday, July 11, 2013

Simple Sweet Cherry Walnut Muffins

Hello again!  Have you been enjoying Summer's bountiful supply of produce like I have?!  These past few weeks I have been frequenting our local Farmer's Market each Thursday.  The produce is so fresh and very inexpensive.   My only problem is having a smaller than average fridge, which continues to drive me nuts, but has also made me a pro at finding creative uses for everything before it goes bad :-)

I am slightly obsessed with fruit, and it doesn't last long around here... but, I did have a bag of cherries that I wasn't consuming quickly enough.  So, being a muffin lover, I adapted a few of my tried and true muffin recipes and came up with this one for cherry walnut muffins... I simply had to share it with all of you!

Simple Sweet Cherry Walnut Muffins

Ingredients:

1 cup whole wheat pastry flour
1/2 cup whole oats
1/4 cup brown sugar
1/2 teaspoon salt
2 teaspoons baking powder
1 teaspoon cinnamon
1/3 cup unsweetened applesauce
1/3 cup milk
1 egg
1 teaspoon vanilla
1/2 cup chopped walnuts
1 cup pitted, chopped fresh black sweet cherries

Directions:

Preheat oven to 400° F. Spray 6 muffin cups with non-stick spray.
Combine the flour, oats, sugar, salt, baking powder, and cinnamon in a medium size bowl. Set aside.
In a smaller bowl, mix together the applesauce, milk, egg, and vanilla.
Stir the wet ingredients into the dry to combine.  Then add the walnuts and cherries to the batter and stir to incorporate.
Spoon batter into the prepared 6 muffin cups and fill each to the very top.  You should not have any batter leftover.
Bake for 20 minutes or until golden brown on top and cooked through.  Let cool in the pan for at least 10 minutes.

Enjoy warm or at room temperature!


These muffins made my apartment smell delightful.  They have the perfect amount of sweetness, the oats and walnuts add a nice texture, and did I mention that they are quite healthy?!   I always replace the oil with unsweetened applesauce when making breakfast muffins, and try to keep the added sugar to a minimum.  You'll never miss all that sugar when you have the juicy sweetness of the cherries in every bite!

If you don't have cherries on hand, or you plain don't like them, you can make these guilt-free muffins using almost any other kind of fruit... blueberries are always wonderful, but I could also see these being delicious with chopped fresh peaches, which are also in season right now!

Happy baking :-)

Librarian turned Foodie